9 Best Steps to Make The Best Wedding Album and Unique Ideas
Now that your big day is gone, do you not want to relive the moments? Of course, you have scrolled through all the images and posted your favorites onto Instagram. But what now? Shall we go back to the traditional way of designing a wedding album? Let’s check out!
Just like you wanted your big day to be special, I bet you also want the memories to be specially engraved as well. To showcase your beloved memories from your big day, the images must be put up in style. In this article, we have discussed how you can make your own wedding album online to capture the attention of the viewers.
Table of contents:
1. Why should you choose wedding photobook over an album?
2. Wedding album design ideas
3. DIY Wedding Album: Step by step
4. Conclusion
Why Should You Choose Wedding Photo Book Over an Album?
Yes, there is a difference! The easiest possible way to describe is that a traditional photo album consists of two things – photo prints and the album. But, when it comes to a photo book, it is a single thing.
Photo Album: Here, pictures are inserted into separate album plastic sheets depending on the orientation of images. They are manually organized after printing the images separately.
Photo Book: Here, all you need to do is choose a photo book printing service and upload your images. You do not need to buy any album separately neither arrange the images after printing the images.
Photo Book has professional finishing, less work, and you can add all your favorite images. Either make collages or add a single image on a page; completely your choice!
Wedding Album Designing Ideas
You can absolutely design it your way, yet we have curated a list of three wonderful wedding album designing ideas.
1. Embellishments
Add a few patterns, be it a flower or some geometric shapes; embellishments add an extra component to the photobook. Keep some room at the corners of the photobook so that you can easily add the elements.
2. Engraved Names
Another classic wedding photobook idea is to select a wooden cover and engrave both your names. It does not only make it more personalized but also elevates the aesthetic look of the photobook.
3. Velvet Touch
Sometimes a few photobook services allow pages of velvet quality. They are usually matte finish and gives a smooth texture to the surface of the images. It gives a new perspective to the rejoiced moments while flipping each memory.
DIY Wedding Album: Step by Step
Always remember, every DIY activity should be fun-filled – be it post wedding or pre wedding. Sometimes creating a DIY wedding photo album can be overwhelming, but hey, a little hard work can bring wonders.
1: Selecting the Images
In this world, when DSLRs and smartphones are readily available in everyone’s hands, so the chances are there are plentiful options to choose from the ambit. Filter all the images through your eyes and select the ones which reflect more of the wedding memories.
2: Editing the Images
Since you are about to store them in a photobook, it is a good call to edit the images first. No, hiring a professional is not required. All you need to do is adjust the brightness, the contrast, maybe the saturation if required. In case you want some retouching to the texture of the image, you can also hire an editing person to do so. A bit of vibrance to your image can look incredible in the photo book.
3: Choosing the Right Photo Book Service
Now that all your images are ready and you are set to arrange them in a nicely decorated photobook, you need to choose an experienced wedding album maker. To do so, either you can go for a service recommended by a known member or check reviews on Google. Check the following checklist if the service is reaching your criteria:
- Are the reviews good enough?
- Do you think they are affordable?
- Did you check a sample photobook and liked it?
4: Uploading the Images
We hope you have already decided which would be the cover photo. Because at this stage, you will have to upload all the images you want to put in the photo book at this stage. So, are you ready? Browse through the laptop and upload the images that you think bring out the most romantic or happy moments from your wedding day.
5: Designing the Photobook
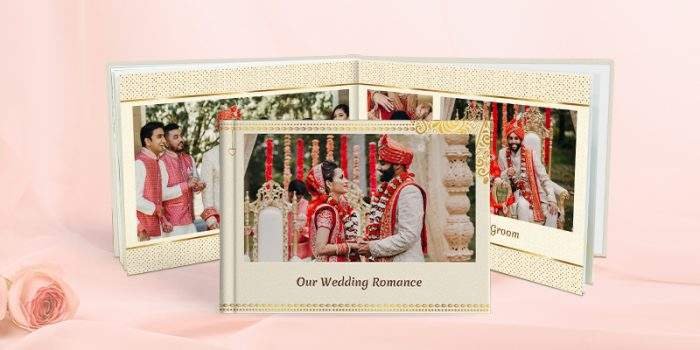
Now comes the real deal – designing the book. Did you select the template? We feel the red color really glamours the feel of the wedding. Or, if you like it sophisticated, you can also go for the combination of white and golden; minimal yet elegant.
6: Adding Designing Elements
After setting all the images, will you want to decorate the photobook a bit? C’mon, arrange your palette and your brush ready because we are about to make you the next Picasso. As the wedding bell goes, in a few images, you can add a few clipart such as a veil or maybe a wedding bell. It surely will add an x-factor to your photobook.
7: The Designing is Not Over Yet
Shall we order the photobook yet? Maybe not! Let’s do something out-of-the-box. A quote is definitely a good idea to make it more personalized. Learn how to have flawless wedding photographs. To create a wedding album without some customization does not feel real. Will you not agree?
8: The Final Step
Yes, you are done! All you have to do is place the order and wait patiently till it arrives at your doorstep. Are you not excited? Because we are! Trust me, you both will look fabulous.
Tying Up the Loose Ends
As the saying goes, “together is a beautiful place to be.” We believe in the same, and hence we understand how important it is for you to treasure those pictures in a photo book. I hope the above list helps you make your D-Day look wonderful that may put a constant smile on your face whenever you take a look at it. So, could we make you smile?