How to Setup Studio Monitors and Improve Room Acoustics
There it is at last: your own room for your recording studio. Regardless of whether it is a study, cellar or storage room. Your own recording studio is to be built here. Your equipment is already piled up in the corner? Are you full of energy? Then let’s get started! But how?
Ok, there is the door, there is the window, then it looks best if the listening monitors (studio monitors, monitor boxes) are here. Most of all, one would like to decide based on optical aspects. And yes, you should definitely feel comfortable in the recording studio. But optics should only take second place. After all, what use is a recording studio to you if the sound you hear does not correspond to the “truth”.
The acoustics are an important factor that is wrongly (!) Often underestimated. Without an acoustically optimized room, you won’t get past a certain level when mixing. It doesn’t matter how good your hearing or talent is.
If you have a certain budget for your recording studio, you should primarily invest in good studio monitors (listening monitors, monitor boxes) and good acoustics. PC, audio interface, software and plugins etc. follow in second place.

Because with bad studio monitors and bad room acoustics you will make a lot of mistakes when setting the equalizers, compressors and the other fine things that are on the market. That costs nerves and a lot of time and yet your mixed song cannot keep up with professional mixes.
If your home studio has not yet been acoustically optimized, you may recognize yourself in a few examples:
- the bass booms
- the kick is too loud
- the voice (singing) does not prevail
- the hi-hat sounds dull or too pointed
- the song has too much reverb
- mix sounds dull
- mix sounds thin
- mix sounds tinny
- mix sounds mushy
- mix sounds different everywhere
So now roll up our sleeves and let’s get started. We begin with the installation of the studio speakers, which are also called listening monitors, studio monitors or monitor boxes.
Requirements for the first step are:
Recommended: best studio monitor speakers under 100
Good, stable and heavy (e.g. sand-filled) monitor stands (monitor tripods) on which the studio monitors stand behind the table or mixer. No monitor stand yet?
Also, before properly setting up the studio monitors, it is important to decouple the studio speakers from the location. And if you have more than one room to choose from, choose the right room. This is briefly discussed below before we get started.
Decouple the loudspeakers from the installation site (studio tripods, studio stands)
The energy generated by a speaker’s membrane is converted into sound.
If a lot of energy is transmitted through the cabinet, stand and / or worktop, it will affect the frequency response. If, for example, we feel a strong vibration on the worktop, then this energy is withdrawn from the loudspeaker and is not radiated. Or other frequencies stimulate something to resonate and thereby generate a sound. As a result, you no longer have the frequency response as originally planned by the manufacturer.
A loudspeaker without decoupling has a strong influence on the sound. Spikes are not recommended. You don’t know exactly where the individual spikes tap the pressure point and which frequency is ultimately hit. Isolation pads, or ISO pads for short, are better. They serve as a decoupling pad.
The right room for good room acoustics
Good room acoustics start with choosing the right room. The suitable mixing room also has to be dealt with, but it becomes much easier to get the frequency response under control. Here are a few important tips for a recommendable room or for unsuitable rooms:
Room size: If we theoretically only increase the volume of the room with the same proportions of height, length and width, then the entire natural frequency distribution shifts to the lower frequencies. This means: the larger the room, the less problematic low frequencies are.

- Larger rooms (with recommended room dimensions) have a more even distribution of the room modes down to the low frequency ranges. The result: a significantly more balanced frequency response before the room acoustics are even improved.
- A square is not practical and good like with a certain chocolate: Rooms in which all edge lengths are the same should not be used for a music studio, recording studio or mastering studio. In such a cube-shaped room, the three natural frequencies fall on one and the same frequency. It would be very difficult if not impossible to treat the room in such a way that this low frequency does not boom. In addition, there would be large gaps in the frequency response between the frequencies.
- In addition to the room where all edge lengths are the same, you should also avoid rooms that are twice as long as wide, twice as long as high, as high as wide, three times as long as high, etc. So they should differ in their dimensions.
Step 1: set up the studio monitors correctly
It is best to leave your equipment (studio table, producer’s chair, PC, audio interface) outside so that your home studio or recording studio is completely empty. Now you take both studio monitors, each on a monitor tripod, and set them up in a stereo position according to the following basics and tips:
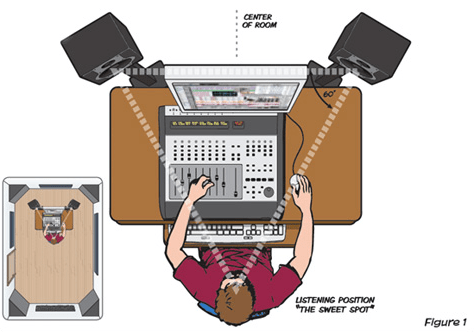
1. The tweeters of your monitor boxes should be level with your ears and pointed towards your ears. You should absolutely avoid placing the monitor boxes at half the height of the room.
Tip: Slightly raising the monitors with a downward incline minimizes reflections from the table surface and ceiling. The tweeters should still be aimed at the listening position. Just give it a try, if you have too strong reflections from the ceiling or table surface. There are also foam insulation pads to buy for this. These also decouple the studio monitors from the underground.
2. The distance between the studio monitors should be roughly 1 to 2 m. For smaller rooms, choose a smaller distance. A good guide then is your arm length. Yes, 30-50 cm is a good choice. The direct sound is then much louder at the ear than the reflected sound arriving afterwards (reverberation of the room). For this you need coaxial loudspeakers, such as the highly recommended KS Digital C5-Reference * . Then the calibration explained later is not quite so vital. Because this is done mainly because of the “bad” reflective sound.
Coaxial speakers are really very important. 2-way or 3-way or reusable systems do not work well in the extreme near field. Extreme near field means that the speakers are very close to the ear (distance of 30-50 cm). With 2-way, 3-way or multi-way systems, a certain minimum distance should be maintained, otherwise too great differences will be heard (different sound impression) from the tweeter, midrange and woofer when you move your head up and down. We don’t have the problem with coaxial speakers because the different paths are on one axis.
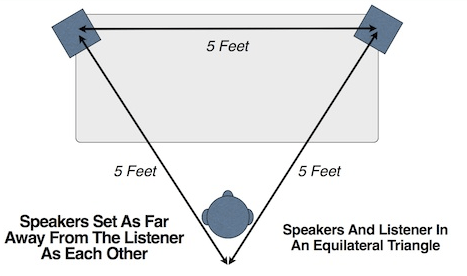
3. Your speakers and ears should form an equilateral triangle. Equilateral triangle? This means that the speakers are the same distance from one another as the tweeters are to your ears (three sides of the same length). The angle of the boxes is 30 °. This is an important prerequisite for ensuring that the audio signals are correctly mapped at the listening position in terms of location and depth. However, it does not matter if a different angle of the studio speakers gives better results for your room – the studio speakers are closer or a little further apart. In any case, it is very important to maintain the symmetry under point 6.
Conclusion: better room acoustics with these tips
Follow the tips and instructions to improve your room acoustics in a structured way. So you can first have good acoustics in your room without complicated scientific explanations and background knowledge.
So far we’ve only focused on the mid and high frequencies. It is particularly difficult to get a grip on the sound energy in the lower range of the frequency spectrum. Therefore we dedicate ourselves with full energy in the next article to the low frequencies.
A little suggestion at the end: There is a well-known concept for attaching the absorber: the live-end-dead-end, or LEDE for short. Sounds complicated at first, but it isn’t. The principle: The front part of the recording studio is equipped with sound-absorbing material. You look at this part when you sit at your listening position. The rear part of the recording studio will be equipped with sound-reflecting surfaces.


